Do you want to use an image file as your Custom Shape in Photoshop CS5 but don’t know how to do it? Stop worrying now, this tutorial is intended for you. What is CSH file extension? The CSH file extension is associated with Adobe Photoshop , a professional image-editing standard and leader of the Photoshop digital imaging line, developed by Adobe Systems Incorporated. CSH files are used for custom vector shapes (objects), such as logo of a sexy lady for a magazine cover and can be saved and loaded in Adobe Photoshop. Cust…
Looking for a FREE Editable Templates for Tarpaulin in PSD format? Just click the images below. Enjoy! a lovely day rural green starry starry night cityscape bubbling tangerine wooden day Click this link for another Free sets of editable templates you can use when doing layouts for birthdays or any kind of parties in Adobe Illustrator CS5 format. Customize your own t-shirts using these editable designs in EPS file format . You are free to modify and apply your T-shirt design ideas using these unique, custom t-shirts …
Glenn Tees|Clobbering Humor and T-shirt Printing!
WHAT happen if humor and T-shirt printing collides? Well, AWESOME T-SHIRT PRINTS! That’s how GLENNZ TEES did to their tees and related products. GLENNZ TEES LLC is based in Austin, Texas. Their sales began in early 2008 and shipping to over 80 countries and wholesale tees to business all over the world. Glenn Jones is a freelance graphic designer and illustrator from Auckland, New Zealand. The name GLENNZ was actually tells where it based (GLENN + NZ) . He uses GLENNZ as his username on T-shirt design site Threadless.com, which is where all it start…
A Perfect Mother's Day Gift Ideas
Mother's Day 2012 will be on Sunday, the 13th of May. It will be the most beautiful and appropriate moment to spend time with your mom. But before going to the store and picking up those chocolates hampers or flower bouquets at the store's window display, that are beautifully packed and ready to offer for moms on Mother's Day, maybe you need to think first on what is the perfect gift you could offer for your mom on this once a year celebration for her than that. But what are the perfect Mother's Day gifts that suit her taste? Let m…
Featured Post
 Free templates
Free Tarpaulin Template for Your Family Reunion!
25.5.12
How to Transform Silhouette Image into Custom Shapes Using Photoshop CS5
What is CSH file extension?
 |
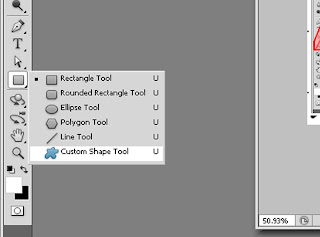
| By default, Custom Shape Tool is under the Rectangle Tool Just right-click the icon and select Custom Shape Tool |
The shape tools provide an easy way to create buttons, navigation bars, and other items used on web pages.
 |
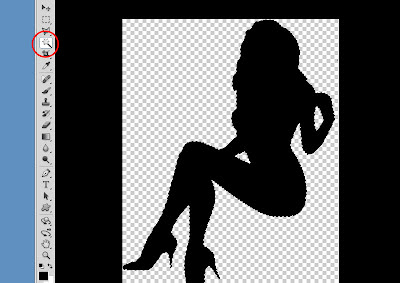
| Layering the silhouette image from background. |
 | |
|
 |
| Selecting the white background using rectangular marquee tool. |
 |
| Deleting the white background. |
 |
| Selecting the image using Magic Wand Tool. |
 |
| Converting the image file into a work path. |
 |
| Setting the Tolerance in 1.0 pixels. |
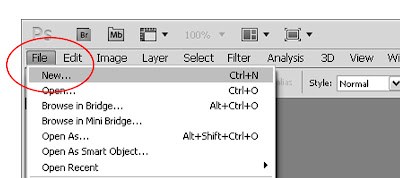
9. Clicking Edit menu at the top left corner of the screen and choose Define Custom Shape, renaming it, and it's done. You have now your very owned Custom Shapes for Photoshop.
 |
| Renaming the shape. |
20.5.12
Free Editable Templates for Tarpaulin in Photoshop Format
Just click the images below. Enjoy!
 |
| a lovely day |
 |
| rural green |
 |
| starry starry night |
 |
| cityscape |
 |
| bubbling tangerine |
 |
| wooden day |
Click this link for another Free sets of editable templates you can use when doing layouts for birthdays or any kind of parties in Adobe Illustrator CS5 format.
Customize your own t-shirts using these editable designs in EPS file format. You are free to modify and apply your T-shirt design ideas using these unique, custom t-shirts designs.
Click here if you are looking for Free Editable Birthday Tarpaulin Template in PSD file format.
15.5.12
Glenn Tees|Clobbering Humor and T-shirt Printing!
| Angry Species |
| Continuous Gaming |
| Anger Management |
| Castaway |
| Secret Habit |
| Dental Care |
5.5.12
A Perfect Mother's Day Gift Ideas
But what are the perfect Mother's Day gifts that suit her taste? Let me share with you my perfect Mother's Day gift ideas. Yes. It is only an idea that I'm hoping to realize.
I'll confess, I never tried dating with my mom ever since. Not because I am a bad son to her but because I don't know how. I don't know what she likes or even, I don't know if she's fond of that "dating" thing. And I'm afraid to ask (my bad). But, if I will be given a chance to spend time with her, these are my list of how my perfect Mother's Day gifts would be.
Unknown Mother | My first drawing entry at ratemydrawing.com
Idea #1
When I was 10 years old, I envied my classmates having their moms in our school during Mother's Day celebration. And I know that my mother is not like their moms. She showed her support in a different way not the same way like their mother's did, attending any school programs for the whole school years. And there’s a part of the program where our teacher asks us to tell something about our moms and the giving cards and hugging and kissing them... I was their left at my chair holding my personalized Mother's Day card and wishes that somehow she would come.
So, if given another chance as I've said, I will do it again this time. I want to tell the world how lucky I am to have her as my mother, that what I am today won't happen without her. And hug her tight and kiss her. And give her the most beautiful and colorful Mother's Day card I personally made.
Idea #2
When I was in high school, I almost forgot how to celebrate the occasion. What always on my mind, aside from studying is how to get involve with my peers and busy making things to win the heart of my first love.
Again, if given a chance, it is in my idea to offer my mom my involvement in everything she loves.
Idea #3
Now, I am working, gaining salary that can make my ideas come true. But still cannot do it. And it won’t work either because I am miles away from home, away from her. The thing that I wanted her to offer me before was the thing I am now longing to have… TIME.
Though I never gave her the material things or showed her the fancy places in the world, I am still proud that my UNDYING LOVE for her was I guess, is my most perfect Mother’s Day gift to her that I never mentioned as part of my ideas because it's not. It is for real.
I’ll be sending my LOVE, to the first face I saw and admired. To the woman who was there with me from the beginning of my life; to the same woman who rebuke me when I’m doing the wrong way; to my mama Nita whom I have debt for carrying me inside her bosom for 9 months and giving me this wonderful life, I will send it all to you.
Ahmm.. Okay, I’ll send chocolates and flowers, too. What else you want mom? ^^,.
How about you? What was the best gift you remember you gave to your mother? My advice... Go out with her! Have time with her while she was there with you. Treat her in a special way that she will never forget for the rest of her life. ^^,
To all the mothers in the world and to all of you who’s reading this, HAPPY MOTHER’S DAY to you and to your mom!!!
You may also love to read my other post: Woman named, Juanita
Link List
My Other Blogs
Followers
Search This Blog
Blog Archive
Categories
- Admin's Thoughts 11
- animation 1
- art blog 3
- Baby Shark 1
- Birthday 5
- Buzz Lightyear 1
- Charcoal Portraits 1
- children display 1
- color 1
- color basic 3
- Color Separation 4
- Design 11
- digital textile printing 4
- display 1
- doodle 2
- doodling 2
- drawing 6
- featured art 8
- featured artist 4
- frame 1
- Free templates 18
- Freebies 12
- google doodle 1
- google panda 1
- grid lines 1
- Hari Raya Aidil Fitri 2
- Hari Raya Aidilfitri 2012 1
- Holy Week 1
- how to 12
- Hua Ho Department Store 1
- Invitation 2
- Istana Nurul Iman 1
- links and them 1
- Mother's Day Special 1
- Open House 1
- painting 1
- Palace Open House 2012 1
- panda 1
- Photoshop 13
- photoshop cs5 1
- sensitizer and glue 4
- Silent Wednesday 1
- Silk screen printing 6
- sketch 1
- sketching 4
- sketching lesson 2
- styrofoam carving 1
- Sultan of Brunei 1
- T-shirt printing 8
- Tarpaulin 12
- toys 1
- tutorials 19
Tags
Popular Posts

Stretch Me This Way | Silkscreen Tutorial

Free Editable Birthday Tarpaulin Template in PSD format

Free Editable Templates for Tarpaulin in Ai CS5 format

CMYK Pattern for T-shirt Printing Using Photoshop

7 Steps Doodling Lion’s Face Out from a Rectangle

Free Editable Birthday Tarpaulin Template in PSD format

Stretch Me This Way | Silkscreen Tutorial


